Work Queue and Makeflow Tutorial
- Getting Started
- Simple Makeflow Example
- Work Queue with 100 Instances of the Simulation Executable
- Homework: Work Queue Application with Dynamic Work: MD5 Brute Force Cracking
This homework tutorial will have you install CCTools into your FutureGrid home directory and will take you through some distributed computation examples using Makeflow and Work Queue.
Getting Started
Login to the Future Grid Head Node
For this homework, we assume you have an open SSH connection to the Future Grid alamo login node. If you do not have an account with Future Grid, then you may register here
Download, Build and Install CCTools
Navigate to the download page in your browser to review the most recent versions: http://www.nd.edu/~ccl/software/download.shtml
Setup a Sandbox for this Tutorial and Download a copy of CCTools 3.5.3
mkdir ~/cctools-tutorial
wget http://www.nd.edu/~ccl/software/files/cctools-3.5.3-RC1-source.tar.gz
tar xzf cctools-3.5.3-RC1-source.tar.gz
Build and Install CCTools
cd ~/cctools-3.5.3-RC1-source
./configure --prefix ~/cctools && make install
Set Environment Variables
You will also want to add your CCTools directory to your $PATH
export PATH=~/cctools/bin:${PATH}
We will use Python in this tutorial. It will need to be able to find our installed packages.
export PYTHONPATH=${PYTHONPATH}:~/cctools/lib/python2.4/site-packages
Simple Makeflow Example
Setup
mkdir ~/cctools-tutorial/makeflow-simple
cd ~/cctools-tutorial/makeflow-simple
Download simulation.py which is our application executable for this exercise. Download this Makeflow file which defines the workflow.
wget http://www.nd.edu/~ccl/software/tutorials/css2012/simple/simulation.py
wget http://www.nd.edu/~ccl/software/tutorials/css2012/simple/Makeflow
The Makeflow should look like:
$ cat Makeflow
input.txt:
	LOCAL /bin/echo Hello World > input.txt

A: simulation.py input.txt
	python simulation.py 1 < input.txt > A
B: simulation.py input.txt
	python simulation.py 2 < input.txt > B
C: simulation.py input.txt
	python simulation.py 3 < input.txt > C
D: simulation.py input.txt
	python simulation.py 4 < input.txt > D
Running with Local (Multiprocess) Execution
Here we're going to tell Makeflow to dispatch the jobs using regular
local processes (no distributed computing!). This is basically the same
as regular Unix Make using the -j flag.
makeflow -T local
If everything worked out correctly, you should see:
$ makeflow -T local
/bin/echo Hello World > input.txt
python simulation.py 4 < input.txt > D
python simulation.py 3 < input.txt > C
python simulation.py 2 < input.txt > B
python simulation.py 1 < input.txt > A
nothing left to do.
Running with FutureGrid's Torque
The following code tells Makeflow to dispatch jobs using the Torque batch submission system (qsub, qdel, qstat, etc.).
makeflow -T torque
You will get as output:
$ makeflow -T torque
nothing left to do.
Well... that's not right. Nothing was run! We need to clean out the generated output files and logs so Makeflow starts from a clean slate again:
makeflow -c
We see it deleted the files we generated in the last run:
$ makeflow -c
deleted file D
deleted file C
deleted file B
deleted file A
deleted file input.txt
deleted file ./Makeflow.makeflowlog
Now let's try again:
makeflow -T torque
We get the output we expect:
$ makeflow -T torque
/bin/echo Hello World > input.txt
python simulation.py 4 < input.txt > D
python simulation.py 3 < input.txt > C
python simulation.py 2 < input.txt > B
python simulation.py 1 < input.txt > A
nothing left to do.
Notice that the output is no different from using local execution. Makeflow is built to be execution engine agnostic. There is no difference between executing the task locally or remotely. However, submission and wait times will definitely lag compared to Work Queue because of the latency of the underlying batch job submission platform. Work Queue excels at handling low latency and short turn-around time jobs.
So, for the output of the simulation, we can confirm that the job was run on another host:
$ cat D
Running on host c052.cm.cluster
Starting 2012 30 Jul 13:18:18
x = 2.0
x = 1.41421356237
x = 1.189207115
x = 1.09050773267
x = 1.04427378243
Finished 2012 30 Jul 13:18:23
Here we see that the worker ran on node c052.cm.cluster. It took 5 seconds to complete.
Running with Work Queue
We will start Makeflow which will setup a Work Queue master on an arbitrary port using -p 0. Next, we'll examine the debug output saved to makeflow.debug to see what port it's listening on so we can start a worker.
makeflow -c
makeflow -T wq -p 0 -d all -o makeflow.debug > /dev/null 2> /dev/null &
We can now inspect the output to see the port (in bold):
$ cat makeflow.debug
2012/07/30 12:18:54.30 [10131] makeflow: debug: checking for duplicate targets...
2012/07/30 12:18:54.30 [10131] makeflow: debug: checking rules for consistency...
2012/07/30 12:18:54.30 [10131] makeflow: tcp: listening on port XXXX
2012/07/30 12:18:54.30 [10131] makeflow: wq: Work Queue is listening on port XXXX.
2012/07/30 12:18:54.30 [10131] makeflow: batch: started process 10132: /bin/echo Hello World > input.txt
2012/07/30 12:18:54.30 [10131] makeflow: debug: node 0 waiting -> running
2012/07/30 12:18:54.30 [10131] makeflow: debug: Job 10132 has returned.
2012/07/30 12:18:54.30 [10131] makeflow: debug: node 0 running -> complete
2012/07/30 12:18:54.30 [10131] makeflow: debug: node 4 waiting -> running
2012/07/30 12:18:54.30 [10131] makeflow: debug: node 3 waiting -> running
2012/07/30 12:18:54.31 [10131] makeflow: debug: node 2 waiting -> running
2012/07/30 12:18:54.31 [10131] makeflow: debug: node 1 waiting -> running
Now, run the work_queue_worker with the port (-p port) the master is listening on.
work_queue_worker -t 5 -d all localhost XXXX
The debug output for the worker will appear on your terminal. When the tasks are finished, the worker should quit due to the 5 second timeout.
Running with Work Queue Workers on Torque
Our final goal is to setup Work Queue workers on Torque compute nodes. Here we submit the worker tasks using the torque_submit_workers executable. We still use the catalog server and a project name so workers can find the master.
makeflow -c
torque_submit_workers -a -N fg-tutorial -t 120 2
makeflow -T wq -a -N fg-tutorial -d all -o makeflow.debug > /dev/null 2> /dev/null &
While Makeflow is running, you can look at the current Work Queue projects.
$ work_queue_status
PROJECT            NAME                    PORT  WAITING  BUSY COMPLETE WORKERS
[...]
fg-tutorial        login1.futuregrid.tacc  1024        4     0        0       0
work_queue_status is a useful tool for checking on your various Work Queue projects. The output includes various data on the tasks and workers the Master is managing. Here we see there are 4 tasks currently but no workers are connected, yet.
Work Queue with 100 Instances of the Simulation Executable
It is simple to write a program in C/Perl/Python (or any language with appropriate Work Queue bindings) which can generate tasks to be queued for Work Queue. In this example, we will create 100 simulation tasks using the same simulation.py code. We will continue to use Torque for this example.
Setup
mkdir ~/cctools-tutorial/wq-100
cd ~/cctools-tutorial/wq-100
wget http://www.nd.edu/~ccl/software/tutorials/css2012/wq-100/simulation.py
wget http://www.nd.edu/~ccl/software/tutorials/css2012/wq-100/wq-100.py
wget http://www.nd.edu/~ccl/software/tutorials/css2012/wq-100/input.txt
Analysis
We will analyze the code for this example to prepare you for the following section which is more advanced.
#!/usr/bin/env python

from work_queue import *
import sys

try:
    Q = WorkQueue(port = 0, name = "fg-tutorial", catalog = True)
except:
    print "could not instantiate Work Queue master"
    sys.exit(1)

print "Listening on port %d." % Q.port

print "Submitting 100 simulation tasks..."
for i in range(0, 100):
    infile = "input.txt"
    outfile = "file.%0.2x" % i
    command = "python simulation.py %d < %s > %s" % (i, infile, outfile)

    T = Task(command)

    T.specify_file("simulation.py", "simulation.py", WORK_QUEUE_INPUT)
    T.specify_file(infile, infile, WORK_QUEUE_INPUT)
    T.specify_file(outfile, outfile, WORK_QUEUE_OUTPUT)
    taskid = Q.submit(T)
print "done."

print "Waiting for tasks to complete..."
while not Q.empty():
    T = Q.wait(5)
    if T:
        print "task (id# %d) complete: %s (return code %d)" % (T.id, T.command, T.return_status)

print "done."
①Here we load the work_queue Python binding. Python will look in PYTHONPATH which is set when you setup your environment.
②This instantiates a WorkQueue master to which you may submit work. We give this master a project name of fg-tutorial and turn on catalog mode. This allows workers to locate the hostname and port our master is running on dynamically via the catalog server. Setting the port to 0 instructs Work Queue to pick an arbitrary port to bind on.
③We create a task which takes a shell
command argument. In the first run, we will have the command:
T = Task("python simulation.py 1 < file.00 > file.01");
④Each task usually depends on a number of files to run. These include the executable and any input files. Here we specify the simulation.py executable and its input file infile. Notice that we specify both simulation.py and infile twice when calling specify_file. The first argument is the name of the file on the master and the second argument is the name of the file we want created on the worker. Usually these filenames will be the same as in this example.
⑤This the output file, outfile, we want transferred back to the master.
⑥At this point we have finished the description of our task and it is ready to be submitted to Work Queue workers. Q.submit submits this task.
⑦At this point we wish to wait for all submitted tasks to complete. So long as the queue is not empty, we continue to call Q.wait waiting for the result of a task we submitted.
⑧Here we call Q.wait(5) which takes a timeout argument. The call to wait will return a finished task which allows us to analyze the return_status or output. In this example, we set the timeout to 5 seconds which allows our application to do other things if a task is taking an indordinate amount of time to complete. We could have used the constant WORK_QUEUE_WAITFORTASK to wait indefinitely until a task completes.
Running
torque_submit_workers -t 120 -a -N fg-tutorial 5
python wq-100.py
If you encounter an error, be sure you did not forget to setup your environment.
In-Class Exercise: Chaining Tasks
Our next task is to change the workflow to chain the executions of simulation.py so that the output of one simulation is the input of another. The workflow looks like:
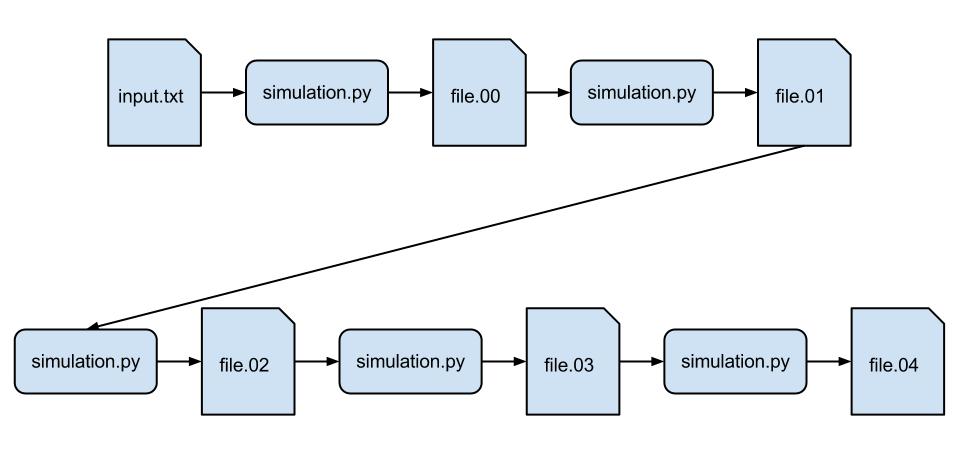
Because our simulation.py is sophisticated and runs on average for 5 seconds, in this example we will only do 5 instances of the simulation (instead of 100) so it takes about 25 seconds.
For this example, remember that when you run Q.submit(T), this finalizes the task and allows it to be sent to a worker for execution. You will need to wait for the output from a worker to come back before sending out the next one. As before, you can wait for the completion of a task on a worker using Q.wait(5).
If you do not know a text editor for Linux, you can use the simple nano text editor which is available on Alamo. A simple tutorial for the editor is here. It can be used similarly to notepad except when you wish to quit you use Ctrl+x. It will prompt you to save and ask you what filename to save to. The default filename to save as is the name of the file you opened.
Once you have finished implementing your own version of the chained simulation, you may compare with this "solution".
Homework: Work Queue Application with Dynamic Work: MD5 Brute Force Cracking
Introduction
In this example, we will examine an MD5 Brute Force cracker written in Python. You will have the task of completing certain Work Queue related code to gain experience for the final section where you will solve an exercise.
The goal of this program is to take an MD5 checksum and find the corresponding plaintext or password. The code is setup to only crack lowercase plaintext in order to reduce the search space. It is divided into two parts:
-
A master coordinator, md5-brute-wq.py that dispatches jobs containing the brute force cracker with a specific plaintext prefix. The brute force cracker will use this prefix to calculate a number of checksums for plaintext that has the prefix. This effectively divides the search space so that a worker is not computing only one sum but is tackling a computationally intensive subset.
-
The brute force cracker, md5-brute.py, accepts as input a plaintext string as a password "prefix". The cracker then computes a number of MD5 checksums using suffixes up to 5 characters long with all lowercase letters. When a successful plaintext match is found, it prints the plaintext and quits. If no match is found, then it quits after exhausting its search space. An example search follows:
- MD5(prefix + '')
- MD5(prefix + 'a')
- MD5(prefix + 'b')
- ...
- MD5(prefix + 'z')
- MD5(prefix + 'aa')
- MD5(prefix + 'ab')
- ...
- MD5(prefix + 'zzzzz')
Notice that we can run multiple brute force crackers concurrently to search a large search space.
Setup
mkdir ~/cctools-tutorial/wq-brute
cd ~/cctools-tutorial/wq-brute
wget http://www.nd.edu/~ccl/software/tutorials/css2012/wq-brute/md5-brute.py
wget http://www.nd.edu/~ccl/software/tutorials/css2012/wq-brute/md5-brute-wq.py
Examining the Code
We will examine the code here and go through filling in the missing parts.
#!/usr/bin/env python

import sys
import string
from work_queue import *

# CHARSET = string.printable
CHARSET = string.ascii_lowercase
WRAPPER = '''
#!/bin/bash

host=$(hostname --fqdn)
if [ -z "${host/%*.cluster/}" ]; then
  module load python/2.7 > /dev/null 2> /dev/null
fi
"$@"
'''

sum = sys.argv[1]

try:
    ## FIXME ##
except:
    print "could not instantiate Work Queue master"
    sys.exit(1)

print "Listening on port %d." % Q.port

def strproduct (charset, repeat):
    def helper (charset, repeat, list):
        if repeat == 0:
            yield string.join(list, "")
        else:
            for char in charset:
                list.append(char)
                for product in helper(charset, repeat-1, list):
                    yield(product)
                list.pop()
    list = []
    return helper(charset, repeat, list)

def task_generator (Q, sum):
    for i in range(0, 32):
        for prefix in itertools.product(CHARSET, repeat=i):
            prefix = string.join(prefix, '')
            print("Dispatching task with prefix '%s'." % prefix)
            T = Task("/bin/bash wrapper.sh python md5-brute.py '%s' '%s'" % (prefix, sum))
            T.specify_buffer(WRAPPER, "wrapper.sh", cache = True)
            ## FIXME ##
            ## FIXME ##
            yield taskid

for taskid in task_generator(Q, sum):
    while not ## FIXME ##
        T = Q.wait(5)
        if T:
            if T.return_status != 0:
                print(T.output)
                sys.exit(T.return_status)
            elif len(T.output) > 0:
                print("Password is '%s'." % T.output)
                sys.exit(0)
As an exercise, we will go through each missing piece of code marked above and guide you through fixing it. You will need to look through our Work Queue Python binding documentation during this exercise.
①The code here is similar to our previous example and the exception handler error indicates we're trying to instantiate a Work Queue master. You will instantiate Work Queue using the project name fg-tutorial and using the catalog server.
②Recall from our discussion of Work Queue with 100 Tasks that you may specify input files to a task. We have already specified a buffer which holds a shell wrapper program. What else are we missing?
③What is the final step for creating a task?
④Again, recall from our discussion of ⑦ in Work Queue with 100 Tasks the loop condition for calling Q.wait. Here, the loop condition is tricky. If we repeatedly call the generator returned by task_generator, we will have a near infinite number of tasks generated which will quickly consume all of the host's memory. This is because creating a task is not the same as submitting a task; tasks are submitted to workers during the call to Q.wait.
We have constructed the previous loop
for taskid in task_generator(Q, sum):
so that on each iteration a new task is added to the queue. The loop
for ④ in this example must detect that
Work Queue has enough tasks to satisfy all of its workers. At this
point, you should consult the documentation
to find the appropriate call to accomplish this.
Complete Code
The complete code is also located here if you want to bypass the self exercise.
You are now ready to continue...
Executing with Shared Workers
This example will use Work Queue workers with the project name fg-tutorial. The catalog server enables us to harness workers from multiple sites automatically without starting each worker with a specific master hostname and port. Essentially, the catalog provides a directory for workers to find masters in their project. The Cooperative Computing Lab maintains a central catalog server which is selected by default.
We will start a number of workers using Torque but the possibility for using workers elsewhere is available to us to decrease time to completion.
torque_submit_workers -a -N fg-tutorial -t 300 10
The above code starts workers on Torque using a 300 second timeout so we do not consume resources for longer than necessary. If a worker does not receive work from a master for 300 seconds, then it will quit. You may need to restart the workers frequently. Your Work Queue master will not complain if workers do not connect.
Running the Master
The Master which coordinates the brute forcing of an MD5 checksum is run using:
python md5-brute-wq.py "<checksum>"
Here we load the Python version 2.7 module available on Future Grid before running the coordinator. The checksum is what we are trying to bruteforce to obtain the corresponding plaintext password. To run a test, let's attempt bruteforcing the MD5 checksum generated from the plaintext "a".
$ echo -n a | md5sum
0cc175b9c0f1b6a831c399e269772661  -
$ python md5-brute-wq.py 0cc175b9c0f1b6a831c399e269772661
Because we are starting at the beginning of the search space, we expect the answer quickly. Once the master connects to a worker, you should see the answer promptly.
The next step is to give the master something more challenging to find by giving it a checksum deeper in the search space. Keeping in mind that the brute force cracker has a search space of 5 characters for its suffix, we use: "eezzzzz". The prefix is "ee". This will result in 4*26+4 or 108 tasks which complete without finding the plaintext before we arrive at an answer. The 4*26+5 or 109th task will find the plaintext.
$ echo -n eezzzzz | md5sum
0c5c2ec346f7c6219d74b2163d5cc366  -
$ python md5-brute-wq.py 0c5c2ec346f7c6219d74b2163d5cc366
Listening on port 9123.
Dispatching task with prefix ''.
Dispatching task with prefix 'a'.
Dispatching task with prefix 'b'.
[...]
Dispatching task with prefix 'ex'.
Dispatching task with prefix 'ey'.
Password is 'eezzzzz'.
If you encounter an error, be sure you did not forget to setup your environment.
Keep in mind that the master coordinator "primes the pump" by dispatching a number of tasks immediately to Work Queue. These are tasks not workers. We dispatch about 100 tasks at the beginning and so it takes some time before Work Queue requires new tasks again. Once the coordinator begins adding new tasks, you will get a feeling for the throughput of the distributed application with the given pool of workers.
Notice that the prefix "ee" was dispatched as a task long before we finally see the result after dispatching "ey".