Makeflow Tutorial
Download and Installation
First log into Chameleon Cloud and start up and instance (CC-CentOS7). Login using ssh, Putty, or a similar tool. Once you have a shell, download and install the cctools software in your home directory in one of two ways:To prep the image:
sudo yum -y install make \
    automake \
    gcc \
    gcc-c++ \
    kernel-devel \
    perl \
    python \
    zlib-devel \
    swig \
    wget \
    vim \
    ImageMagick-devel \
    gnuplot \
    graphviz \
    glibc
| To install a binary package (faster): | To build from source (slower): |
wget http://ccl.cse.nd.edu/software/files/cctools-6.2.2-x86_64-redhat7.tar.gz tar xvzf cctools-6.2.2-x86_64-redhat7.tar.gz mv cctools-6.2.2-x86_64-redhat7 cctools |
git clone https://github.com/cooperative-computing-lab/cctools cctools-src cd cctools-src ./configure --prefix $HOME/cctools make make install cd $HOME |
export PATH=$HOME/cctools/bin:$PATHIf you use tcsh instead, then do this:
setenv PATH $HOME/cctools/bin:$PATHNow double check that you can run the various commands, like this:
makeflow -v
work_queue_worker -v
work_queue_status
Makeflow Example
Let's being by using Makeflow to run a handful of simulation codes. First, make and enter a clean directory to work in:cd $HOME mkdir tutorial cd tutorialNow, download this program, which performs a highly sophisticated simulation of black holes colliding together:
wget http://ccl.cse.nd.edu/software/tutorials/acic17/simulation.pyTry running it once, just to see what it does:
chmod 755 simulation.py
./simulation.py 5
Now, let's use Makeflow to run several simulations. Create a file called example.makeflow and paste the following text into it:
input.txt:
	LOCAL echo "Hello Makeflow!" > input.txt

output.1: simulation.py input.txt
	./simulation.py 1 < input.txt > output.1

output.2: simulation.py input.txt
	./simulation.py 2 < input.txt > output.2

output.3: simulation.py input.txt
	./simulation.py 3 < input.txt > output.3

output.4: simulation.py input.txt
	./simulation.py 4 < input.txt > output.4
To run it on your local machine, one job at a time:
makeflow example.makeflow -j 1Note that if you run it a second time, nothing will happen, because all of the files are built:
makeflow example.makeflow
makeflow: nothing left to do
Use the -c option to clean everything up before trying it again:
makeflow -c example.makeflowArizona HPC uses the PBS batch system, so to run your jobs through PBS, do this: (Note that the -B option passes a bunch of details required by UA HPC.)
makeflow -T pbs -B "-W group_list=ericlyons -q windfall -ljobtype=serial -lselect=1:ncpus=1:mem=1gb -lpack:shared" example.makeflowIf you are working at another site that uses Condor or Torque or SGE, then you would invoke makeflow like this instead:
makeflow -T condor example.makeflow
makeflow -T torque example.makeflow
makeflow -T sge example.makeflow
Running Makeflow with Work Queue
You will notice that a workflow can run very slowly if you submit each job individually, because it typically takes 30 seconds or longer to start each batch job running. To get around this limitation, we provide the Work Queue system. This allows Makeflow to function as a master process that quickly dispatches work to remote worker processes.makeflow -c example.makeflow makeflow -T wq example.makeflow -p 0 listening for workers on port XXXX. ...Now open up another shell and run a single worker process:
work_queue_worker IP XXXXGo back to your first shell and observe that the makeflow has finished. Of course, remembering port numbers all the time gets old fast, so try the same thing again, but using a project name:
makeflow -c example.makeflow
makeflow -T wq example.makeflow -N MYPROJECT
listening for workers on port XXXX
...
Now open up another shell and run your worker with a project name:
work_queue_worker -N MYPROJECT
Running Workers in PBS
Note: This step doesn't work at UA HPC, due to some local firewall limitations, but the same technique works at other sites.Of course, we don't really want to run workers on the head node, so let's instead use pbs_submit_workers to set up five workers in PBS for us:
pbs_submit_workers -N MYPROJECT 5
Creating worker submit scripts in dthain-workers...
2065026.i136
2065027.i136
2065028.i136
2065029.i136
2065030.i136
Use the qstat command to observe that they are submitted to PBS:
qstat
2065027.i136               worker.sh        dthain                 0 R batch
2065028.i136               worker.sh        dthain                 0 R batch
2065029.i136               worker.sh        dthain                 0 R batch
2065030.i136               worker.sh        dthain                 0 R batch
Now, restart your Makeflow and it will use the workers already running in PBS:
makeflow -c example.makeflow
makeflow -T wq example.makeflow -N MYPROJECT
listening for workers on port XXXX.
...
You can leave the workers running there, if you want to start another Makeflow. They will remain until they have been idle for fifteen minutes, then will stop automatically.
If you add the -d all option to Makeflow, it will display debugging information that shows where each task was sent, when it was returned, and so forth:
makeflow -c example.makeflow
makeflow -T wq example.makeflow -N MYPROJECT -d all
listening for workers on port XXXX.
JSON/JX
Using the same makeflow as above, we're going to write the makelfow using JSON. Create a file called example.json and paste the following text into it:
{
"rules":[{
		"outputs":["input.txt"],
		"command":"echo \"Hello Makeflow!\" > input.txt",
		"local_job":true,
	},
	{
		"outputs":["output.1"],
		"inputs":["simulation.py","input.txt"],
		"command":"./simulation.py 1 < input.txt > output.1",
	},
	{
		"outputs":["output.2"],
		"inputs":["simulation.py","input.txt"],
		"command":"./simulation.py 2 < input.txt > output.2",
	},
	{
		"outputs":["output.3"],
		"inputs":["simulation.py","input.txt"],
		"command":"./simulation.py 3 < input.txt > output.3",
	},
	{
		"outputs":["output.4"],
		"inputs":["simulation.py","input.txt"],
		"command":"./simulation.py 4 < input.txt > output.4",
	}]
}
To run it on your local machine, one job at a time:
makeflow --json example.json -j 1Use the -c option to clean everything up before trying it again:
makeflow -c --json example.jsonUsing the same makeflow as above, we're going to write the makelfow using JX. Create a file called example.jx and paste the following text into it:
{
"rules":[{
		"outputs":["input.txt"],
		"command":"echo \"Hello Makeflow!\" > input.txt",
		"local_job":true,
    },
    {
		"outputs":[format("output.%d",i)],
		"inputs":["simulation.py","input.txt"],
		"command":format("./simulation.py %d < input.txt > output.%d", i, i),
    } for i in range(1,5),
	],
}
To run it on your local machine, one job at a time:
makeflow --jx example.jx -j 1Use the -c option to clean everything up before trying it again:
makeflow -c --jx example.jxNow to leverage JX's ability to be used as a template, we will modify the existing example.jx to use a variable range. Change this line:
} for i in range(1,5),
to:
} for i in range(1,LIMIT),
To define what this limit is we can either pass it as a commandline option:
makeflow --jx example.makeflow --jx-define "LIMIT"=5--or-- We can write it into a arguments file (args.jx) that configures the makeflow:
{
    "LIMIT"=10,
}
... and run it with:
makeflow --jx example.makeflow --jx-args args.jx
Resource Specifications
Now we want to specify resources using the Make syntax:Add this to the top of your example.makeflow
.MAKEFLOW CATEGORY analysis
.MAKEFLOW CORES 1
.MAKEFLOW MEMORY 100
.MAKEFLOW DISK 200
Now run it on your local machine, letting the resouces determine concurrency:
makeflow example.makeflowYou should be able to see all of the tasks running at the same time.
Use the -c option to clean everything up before trying it again:
makeflow -c example.makeflowTo see how resources can be used to limit the concurrency at larger scales, we will "scale up" this example by changing the number of expected cores.
.MAKEFLOW CORES 24Try it again on your local machine:
makeflow example.makeflowYou should be able to see only two of the tasks running at the same time.
Use the -c option to clean everything up before trying it again:
makeflow -c example.makeflowAs an exercise, modify or add in a category to allow for three of the tasks to run at the same time.
Visualization
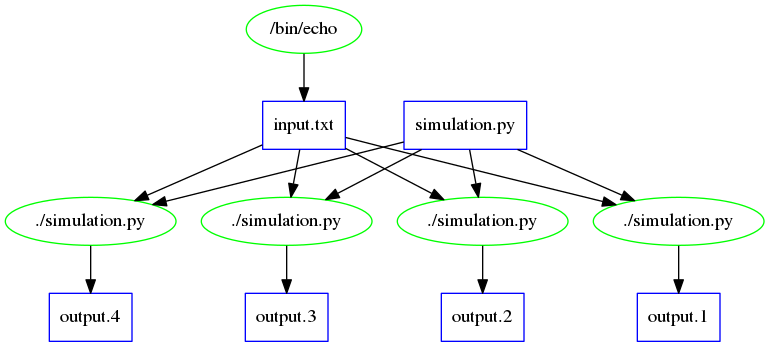
The first way that we will visualize the Makeflow is by looking at the shape of the DAG:makeflow_viz example.makeflow -D dot > example_makeflow_viz.dot dot example_makeflow_viz.dot -Tpng > example_makeflow_viz.pngIt should look something like this:
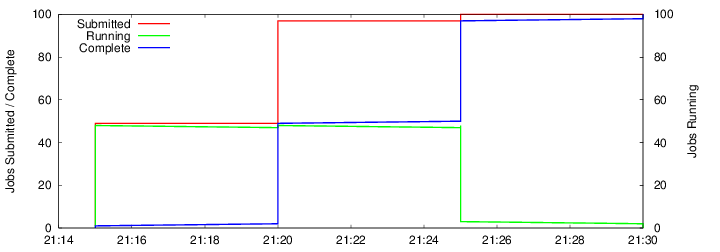
The next way that we will visualize the Makeflow is by looking at the results of the Makeflow:
makeflow_graph_log example.makeflowlog example_graph_log.pngNote: The *.makeflowlog file is created automatically on any run. To name this specifically the -l option is used.
It should look something like this, though much smaller: