Work Queue Tutorial
This tutorial will have you install CCTools into your FutureGrid home directory and will take you through some distributed computation examples using Work Queue.
Getting Started
Login to the Future Grid Head Node
For this tutorial, we assume you have a SSH access to the Future Grid login nodes. If you do not have an account with Future Grid, then you may register here.
In this tutorial, we will again use the alamo login node:
ssh alamo.futuregrid.org
Download, Build, and Install CCTools
Navigate to the download page in your browser to review the most recent versions: http://www.nd.edu/~ccl/software/download.shtml
Setup a Sandbox for this Tutorial and Download a copy of CCTools 4.0.2
mkdir ~/cctools-tutorial
wget http://www.nd.edu/~ccl/software/files/cctools-4.0.2-source.tar.gz
tar xzf cctools-4.0.2-source.tar.gz
Build and Install CCTools
cd ~/cctools-4.0.2-source
./configure --prefix ~/cctools && make install
Tutorial Setup
Set Environment Variables
For this tutorial, you will need to add your CCTools directory to your $PATH:
export PATH=~/cctools/bin:${PATH}
We will use both Python and Perl in this tutorial. They need to be able to find our installed packages. So set this environment variable for running the Python examples:
export PYTHONPATH=${PYTHONPATH}:~/cctools/lib/python2.4/site-packages
And this environment variable for running the Perl examples:
export PERL5LIB=${PERL5LIB}:~/cctools/lib/perl5/site_perl
Work Queue program running the Simulation Executable
It is simple to write a program in C/Perl/Python (or any language with appropriate Work Queue bindings) which can generate tasks to be queued for Work Queue. In this example, we will create 100 simulation tasks using simulation.py.
Setup
mkdir ~/cctools-tutorial/wq
cd ~/cctools-tutorial/wq
wget http://www.nd.edu/~ccl/software/tutorials/acic13/wq/simulation.py
wget http://www.nd.edu/~ccl/software/tutorials/acic13/wq/input.txt
wget http://www.nd.edu/~ccl/software/tutorials/acic13/wq/wq.py
Analysis
We will analyze the code in wq.py to study a workflow implemented using the Python bindings for the Work Queue API.
$ cat wq.py

#!/usr/bin/env python

① from work_queue import *
   import sys

   try:
②   Q = WorkQueue(port = 0)
   except:
     print "could not instantiate Work Queue master"
     sys.exit(1)

   print "Listening on port %d." % Q.port

   print "Submitting 100 simulation tasks..."
   for i in range(0, 100):
     infile = "input.txt"
     outfile = "file.%0.2x" % i
     command = "python simulation.py %d < %s > %s" % (i, infile, outfile)

③   T = Task(command)

④   T.specify_file("simulation.py", "simulation.py", WORK_QUEUE_INPUT, cache = True)
     T.specify_file(infile, infile, WORK_QUEUE_INPUT, cache = False)
⑤   T.specify_file(outfile, outfile, WORK_QUEUE_OUTPUT, cache = False)

⑥   taskid = Q.submit(T)
   print "done."

   print "Waiting for tasks to complete..."
⑦ while not Q.empty():
⑧   T = Q.wait(5)
     if T:
        print "task (id# %d) complete: %s (return code %d)" % (T.id, T.command, T.return_status)

   print "done."
①Here we load the work_queue Python binding. Python will look in PYTHONPATH which is setup in your environment.
②This instantiates a Work Queue master to which you may submit work. Setting the port to 0 instructs Work Queue to pick an arbitrary port to bind on.
③We create a task which takes a shell command argument. The first task created in this workflow will have the command:
T = Task("python simulation.py 0 < input.txt > file.00")
④Each task usually depends on a number of files to run. These include the executable and any input files. Here we specify the simulation.py executable and its input infile. Notice that we specify both simulation.py and infile twice when calling specify_file. The first argument is the name of the file on the master and the second argument is the name of the file we want created on the worker. Usually these filenames will be the same as in this example.
⑤We specify the output file, outfile, which we want transferred back to the master.
⑥At this point we have finished the description of our task and it is ready to be submitted for execution on the Work Queue workers. Q.submit submits this task.
⑦At this point we wish to wait for all submitted tasks to complete. So long as the queue is not empty, we continue to call Q.wait waiting for the result of a task we submitted.
⑧Here we call Q.wait(5) which takes a timeout argument. The call to wait will return a finished task which allows us to analyze the return_status or output. In this example, we set the timeout to 5 seconds which allows our application to do other things if a task is taking an inordinate amount of time to complete. We could have used the constant WORK_QUEUE_WAITFORTASK to wait indefinitely until a task completes.
Perl equivalent
The Perl code of the above program is in wq.pl.
You can download the Perl program using:
wget http://www.nd.edu/~ccl/software/tutorials/acic13/wq/wq.pl
This program is shown below:
$ cat wq.pl

#!/usr/bin/perl

use work_queue;

my $q = work_queue_create(0);
if (not defined($q)) {
   print "could not instantiate Work Queue master\n";
   exit 1;
}

$port = work_queue_port($q);
print "Listening on port $port.\n";

print "Submitting 100 simulation tasks...";
for (my $i = 0; $i < 100; $i++) {
   my $infile = "input.txt";
   my $outfile = sprintf("file.%0.2x", $i);
   my $command = "python simulation.py $i < $infile > $outfile";

   my $t = work_queue_task_create($command);

   work_queue_task_specify_file($t,"simulation.py","simulation.py",$WORK_QUEUE_INPUT,$WORK_QUEUE_CACHE);
   work_queue_task_specify_file($t,$infile,$infile,$WORK_QUEUE_INPUT,$WORK_QUEUE_CACHE);
   work_queue_task_specify_file($t,$outfile,$outfile,$WORK_QUEUE_OUTPUT,$WORK_QUEUE_NOCACHE);

   my $taskid = work_queue_submit($q, $t);
}
print "done."

print "Waiting for tasks to complete...\n";
while (not work_queue_empty($q)) {
    my $t = work_queue_wait($q, 5);

    if (defined($t)) {
      print "task (id#$t->{taskid}) complete:$t->{command_line} (return code $t->{return_status})\n";
⑨    work_queue_task_delete($t);
    }
}

print "done.\n";

⑩ work_queue_delete($q);

exit 0;
⑨In Perl, we need to delete the task stucture to free its allocated memory.
⑩We also delete the queue instance so Work Queue can clean up its memory.
Running
We are now going to run the Work Queue program shown above for running the simulation tasks. Pick one of the programs to run:
| To run the Python program (wq.py) do: | To run the Perl program (wq.pl) do: |
|---|---|
python wq.py |
perl wq.pl |
If you encounter an error when running this step, be sure you did not forget to setup your environment.
When a Work Queue program is run, it prints the port on which it is listening for connections from the workers. For example:
$ python wq.py
Listening on port XXXX.
...
|
$ perl wq.pl
Listening on port XXXX.
...
|
We have successfully started a master and found the port and hostname on which it is listening. The master now is waiting for connections from workers so that it can dispatch the submitted tasks for execution.
To start a work_queue_worker for this master, open another terminal window and login into alamo login node:
ssh alamo.futuregrid.org
As before, replace USERNAME with the username provided to you (and its password).
Add the CCTools directory to our $PATH as before:
export PATH=~/cctools/bin:${PATH}
In this newly opened terminal, start a work_queue_worker for the master by giving it the port and hostname of the master. Also, enable the debugging output (-d all).
work_queue_worker -t 30 -d all localhost XXXX
...
replacing XXXX with the port the Work Queue master program is listening on.
The debug output for the worker will appear on your terminal. When the tasks are finished, the worker will quit after the 30 second timeout.
Running Work Queue workers on Torque
We can also submit workers to run on the Torque cluster in FutureGrid using the torque_submit_workers script.
Start 10 workers on the Torque compute nodes in FutureGrid for this master
torque_submit_workers -t 30 alamo.futuregrid.org XXXX 10
replacing XXXX with the port the Work Queue master program is listening on.
You can also start workers on the HPC/HTC cluster at the University of Arizona through the PBS batch submission system using the pbs_submit_workers script. You can download this script as follows:
wget http://www.nd.edu/~ccl/software/tutorials/acic13/wq/pbs_submit_workers
To start 10 workers on the compute nodes in the HPC/HTC cluster at the University of Arizona, run this from the login node:
pbs_submit_workers -t 30 -p "-q windfall -W group_list=$USER" alamo.futuregrid.org XXXX 10
If you have allocations to the higher priority queues (standard, quality, etc) in the UA clusters, you can submit workers to these queues by specifying the appropriate options.
If you encounter an error, be sure you did not forget to setup your environment.
Exercise
Chaining Tasks
The goal of this exercise is to change the workflow to chain the executions of simulation.py so that the output of one simulation is the input of another. For this exercise, the workflow should look like:
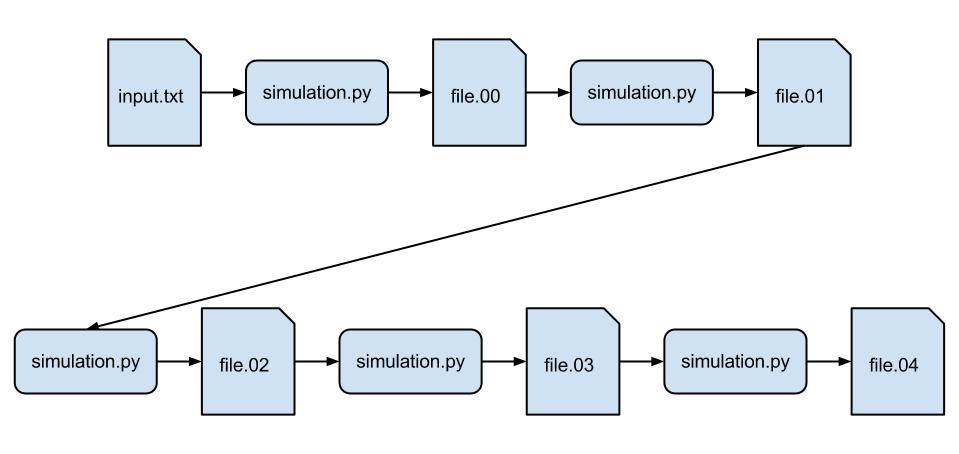
Because our simulation.py is sophisticated and runs on average for 5 seconds, in this example we will only do 5 instances of the simulation (instead of 100) so it takes about 25 seconds.
For this exercise, remember that when you run Q.submit(T), it finalizes the task and allows it to be sent to a worker for execution. You will need to wait for the output from a worker to come back before sending out the next one. As before, you can wait for the completion of a task using Q.wait(5).
Once you have finished implementing your version of the chained simulation, you may compare with this python solution or perl solution.